 +1 (800) 844-6603
 Facebook page





Guides in this section
- OROPOS – Order Taking
- OROPOS-Order Types
- iPP320 Configuration
- Receipts Cutting Off - price not printing properly
- What is Drawer Accountable and Cash To Deposit in Cash Drawer Report?
- How to migrate derby single ( embedded ) to derby server
- How can I add barcode in customer receipts?
- Dejavoo Z6 , Z9 , Z11 Configuration
- How to activate POS & plugin licenses
- Minimum Requirements
- New Store Setup Wizard
- Floorplan Configuration
- Setting up Cloud Database for Siiopa
- Home Delivery and Pick up Using Cust Plugin
- Setting Up A Digital Weight Scale
- Variants In ORO POS
- Store configuration
- Custom Payments in ORO POS
- Inventory On Hand Report
- Customer Loyalty Management
- Re Order Level & Shopping List
- Inventory Configuration
- ORO POS Demo Installation
- Inventory Location Set Up
- Inventory Stock Count
- Inventory: adding a new Vendor
- Inventory Purchase order
- Inventory Stock Conversion
- Inventory Transfer
- FloorPlan: adding A New Floor
- FloorPlan: adding Tables
- FloorPlan: Table Types
- Recipe / Bill of Materials ( BoM )
- Ticket Splitting in ORO POS
- New employee permissions
- Applying Modifier Group of a Menu Item to Other Menu Items
- How to make Hotel Room Reservation / Booking
- How to make Table Reservation / Booking
- Paid, Closed and Open Ticket status
- Coupons, Discounts & Reprice
- Selling Lotteries and Paying Out Winning Tickets
- Emailing Daily Sales Report
- Void & Refund in ORO POS
- Configuring Service Charge
- Payment from customer balance
- Void Item Report
- Sales Report (Non-Inventory Items)
- Sales Report (Inventory Items)
- Configuring Receipt for Different Paper sizes
- Sending Transaction Receipts Via Email
- Adding sticker printer in ORO POS
- Session summary report
- End of day summary report
- Tax-exempt report
- Understanding Sales Balance Report
- Understanding Token Number
- Pre-authorize & Tips Processing
- Capture Credit Card Transactions
- Seat based order
- Showing details of menu items while adding to customers order
- Understanding Gross Receivable, Receipt Differential and Tips Differential
- Understanding ticket number and token number
- PAX S300 Configuration
- Configuring Cash Drawer
- Adding Pizza in ORO POS
- Understanding Tips Payout
- Migration from Floreant POS to ORO POS
- Migrating from Aldelo POS
- Getting ready for Live system
- Configuring Receipt Printer
- Configuring Kitchen Printer
- Printing barcode labels for products
- Modifier price rules
- Hiding server summary button in user view
- Showing tickets on right side in the order view
- Price List
- Changing users password
- Penny Rounding For Canada
- Adding default service charge
- Generating & Activating Gift Card
- Bar Tab
- Making drinks/beverage mandatory in an order type
- Hide MISC button in order
- Configuring IDTECH SecuRED MSR payment device
- Different types of Units in ORO POS
- User type permission
- Combo Items
- Menu page designer
- Menu Group vs Category
- Setting Up Multi-Currency System
- Edit employee clock-in or clock-out time
- Setting up master terminal
- Terminal wise Order Type
- Taxing To-Go Food
- Tax Settings
- Send vs Hold vs Done
- Setting up meal courses.
- How to setup Caller ID device in Cust Plugin
- Visual Receipt Design
- Kitchen Display (KDS) Configuration
- Multiple roles and user permissions.
- Customer Monitor
- Kitchen Item Sticker
- Database setup for Multiple Terminals
- Product and Items in ORO POS
- How to setup your Menu
- Importing Items from Spreadsheet
- Store sessions, opening and closing store
- Translate UI in OROPOS
- Recommended Hardware
Releted Guides
Retail Order Type – How to setup Retail Stores
Retail stores need one-shot order taking process mostly with a barcode scan and some time with integrated digital scale.
Configure Retail Order Type
To create a retail order type go to back-office–> admin–> order type–> create new
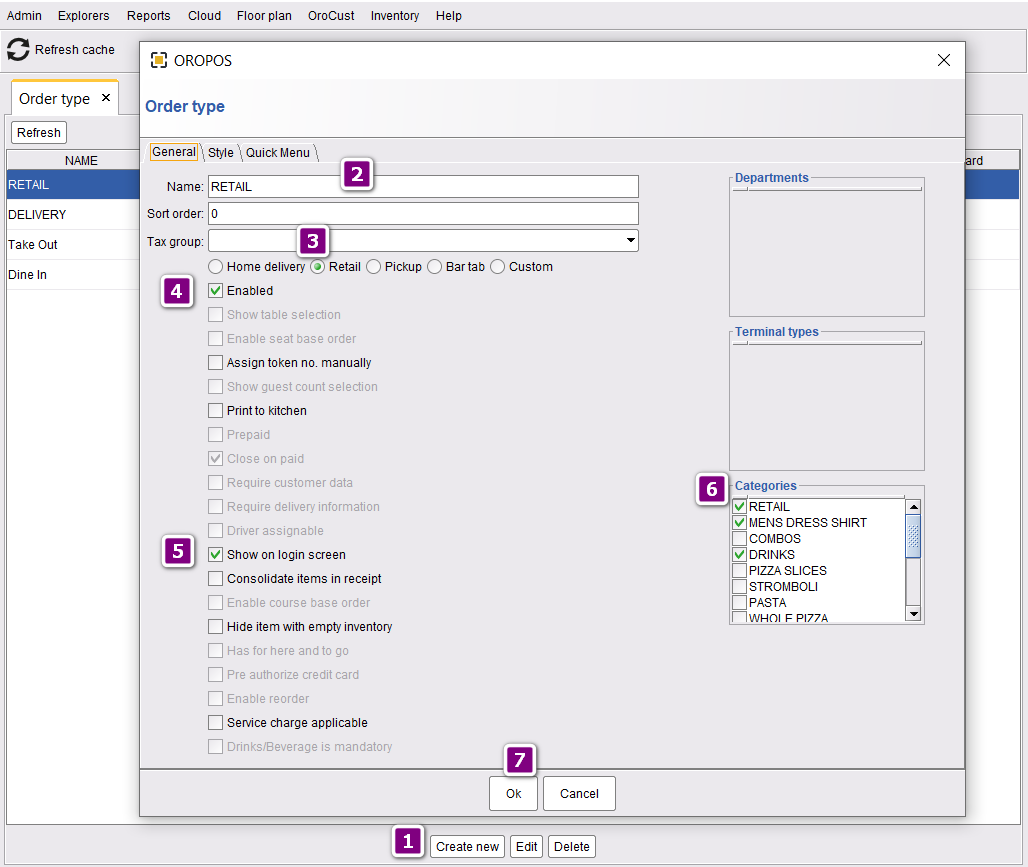
- Click on create new.
- Name your order type.
- Select retail.
- Enable your order type.
- Select show on the login screen.
- Select the categories for this order type.
- Click on ok to save changes.
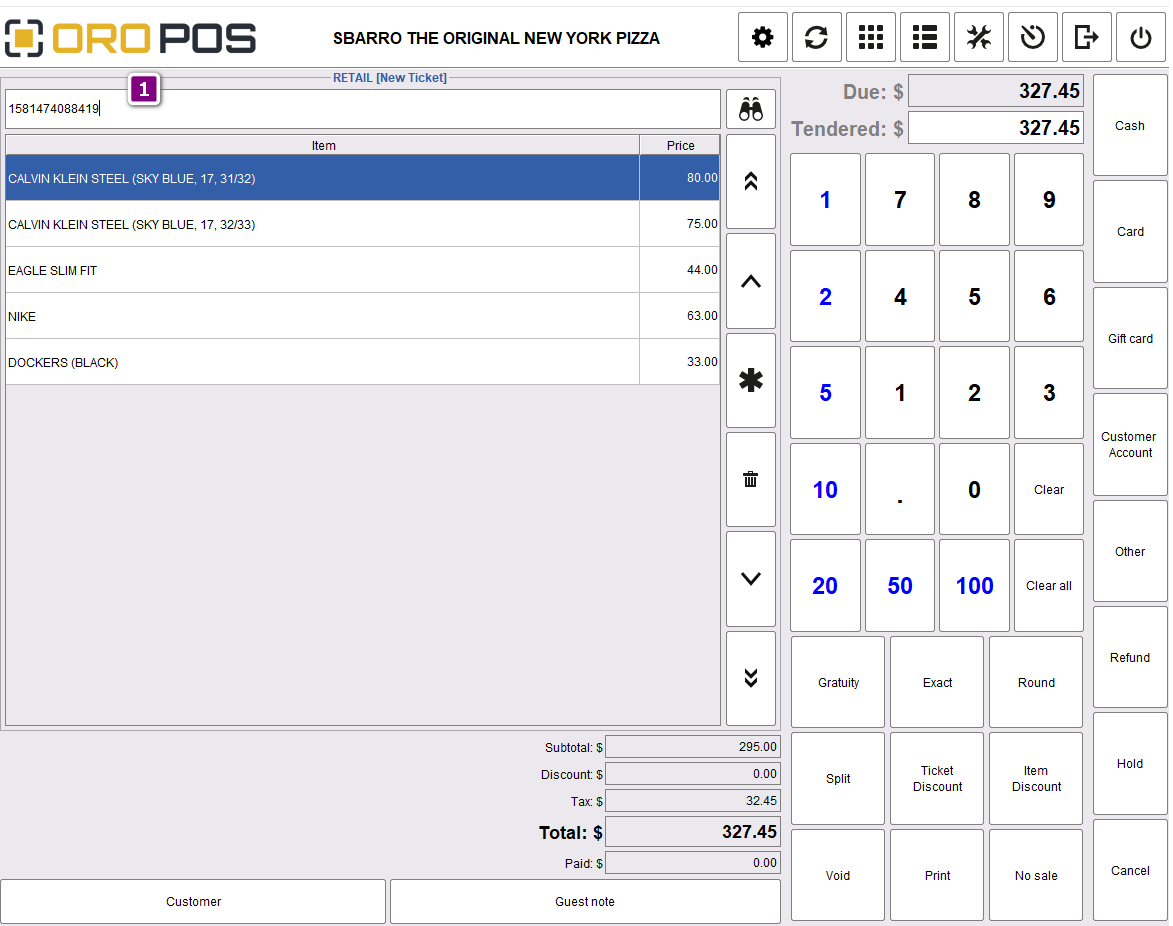
One-shot Order Taking
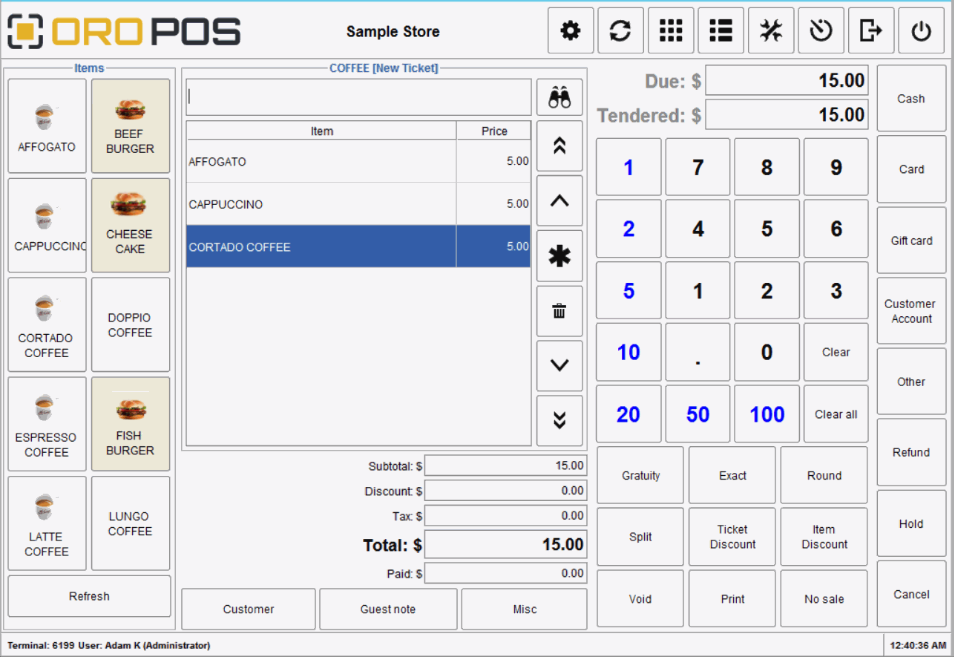
From login screen under the retail order type, you can now take orders by scanning the barcode or entering the name/barcode in the search box (1).
Quick Menu for Non-barcode items
Select Retail type of order in Order type and it should show “Quick Menu” tab. Add items you want to show in the quick menu.
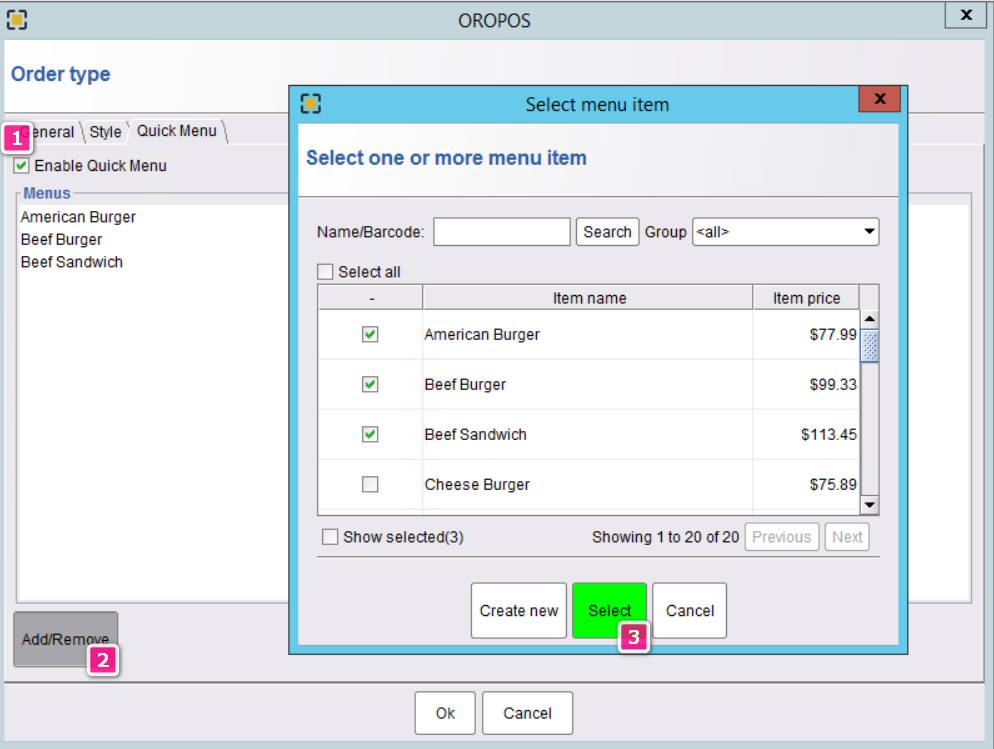
Selected Items will be showing on the left side.
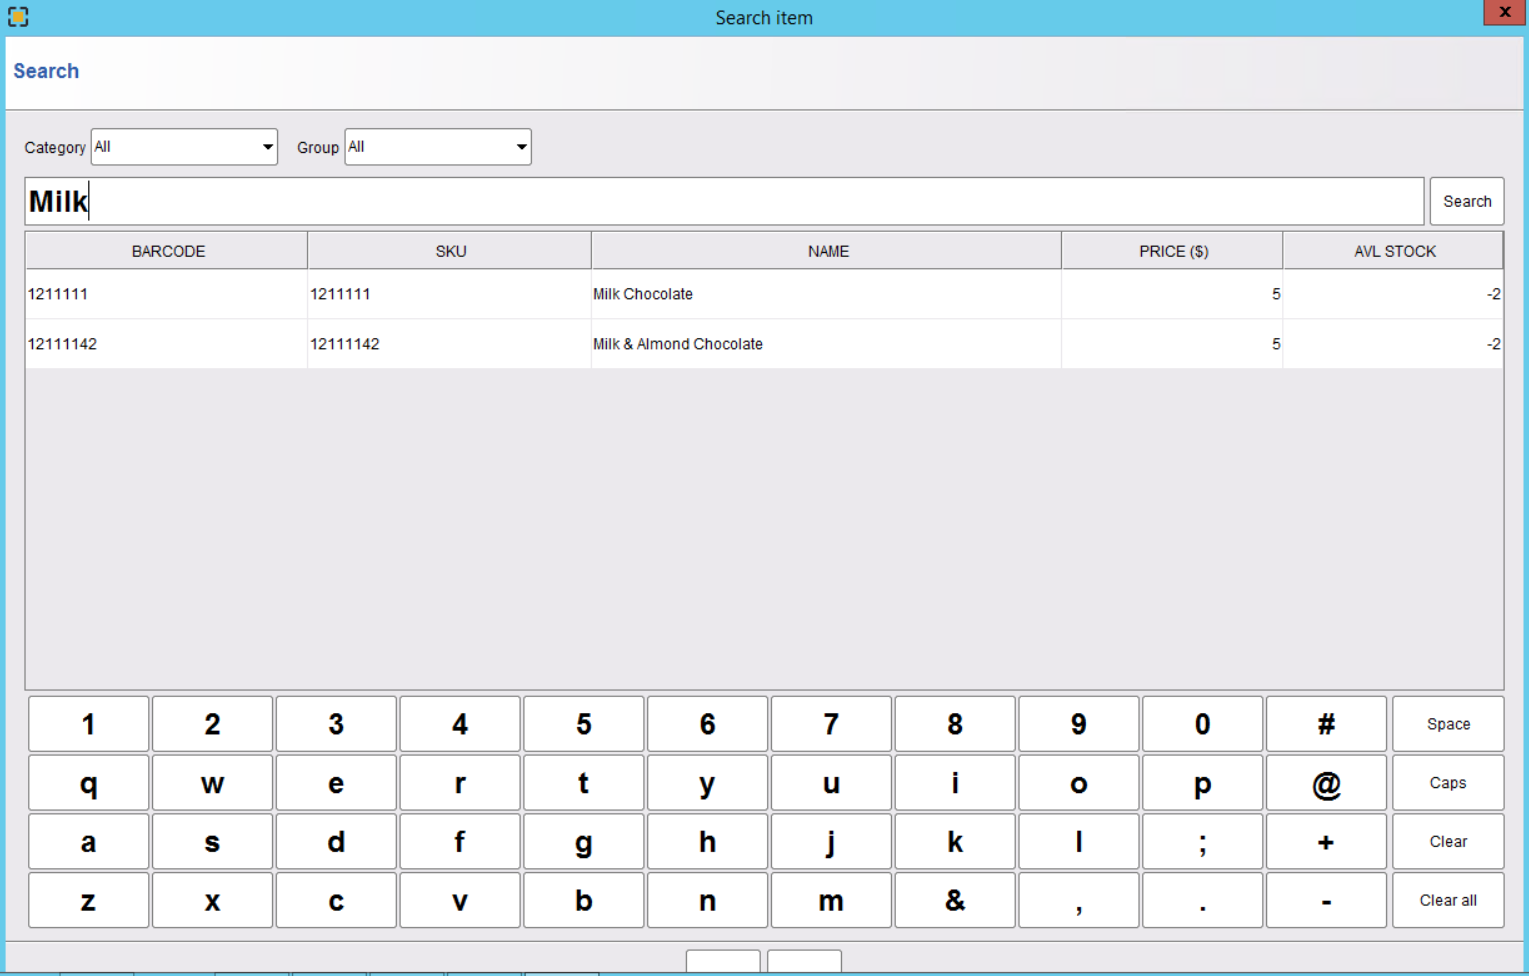
Search Items & Available Stock
The cashier can search items by name as follows. It will also show available stock.
Disclaimer: The information and media included on this website are not legal documents. Whilst we make every attempt to ensure the accuracy and reliability of the information contained in the documents stored, served and accessed on this site, this information should not be relied upon as a substitute for formal advice from our company. Features described in this document are subject to change without any notice.